


Canvas drawing in Android can be an enormous topic to grasp, so setting yourself small achievable (albeit not practically useful) goals can be a great way to isolate things that you’re missing. Hence, this article will demonstrate how to draw and animate a simple countdown timer.
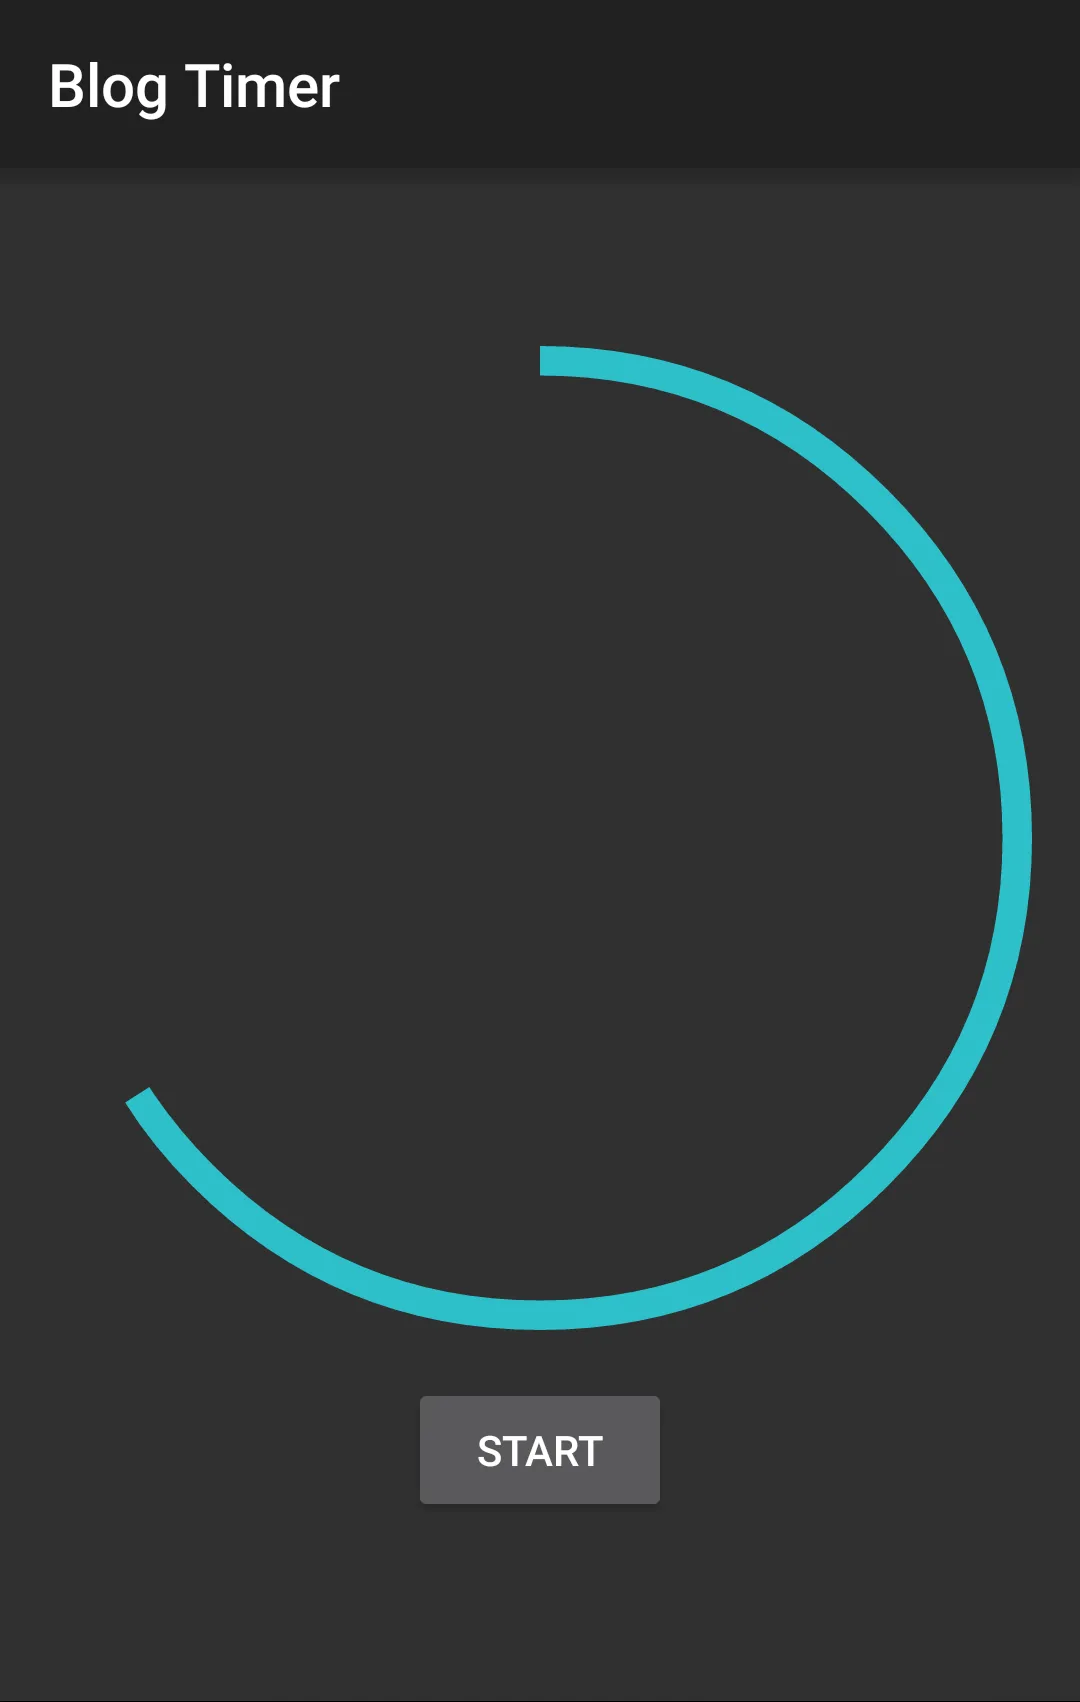
For the sake of clarity and simplicity, the task will be limited to drawing a coloured arc that will start growing from 12 o’clock and all the way around in a predefined time. Below is a screenshot of the timer at around ⅔ of the way into its period.
The solution will consist of preparing the custom view, drawing an arc and finally animating it.
How you create your custom view is largely dependent on how it integrates with the rest of the application, so I will keep this section intentionally vague. However, to see one possible working implementation, refer to the source code below in the “Resources” section.
We start with a new class that simply extends View. Because we will use an eraser to remove the inside diameter of the circle to make it an outline, the drawing needs to happen on a bitmap, which has a specific size. Hence, we create that bitmap (along with its canvas) in onSizeChanged() as follows.
@Override
protected void onSizeChanged(int w, int h, int oldw, int oldh) {
    if (w != oldw || h != oldh) {
        mBitmap = Bitmap.createBitmap(w, h, Bitmap.Config.ARGB_8888);
        mBitmap.eraseColor(Color.TRANSPARENT);
        mCanvas = new Canvas(mBitmap);
    }

    super.onSizeChanged(w, h, oldw, oldh);
    updateBounds();
}
The rest may be unnecessary for your particular application, however, one trick that is useful for any circular content is how to make the view bounds square regardless of the adjusted width.
@SuppressWarnings("SuspiciousNameCombination")
@Override
protected void onMeasure(int widthMeasureSpec, int heightMeasureSpec) {
    super.onMeasure(widthMeasureSpec, widthMeasureSpec);
}
There are three parts to drawing an arc: creating the paints, defining the bounds for the inner and outer edges of the circle and then applying both to make the image appear on screen.
First we define the paint for drawing the colored circle. How you want to set the color depends on your requirements, but it’s a good idea to supply that as an attribute.
mCirclePaint = new Paint();
mCirclePaint.setAntiAlias(true);
mCirclePaint.setColor(circleColor);
Next comes the eraser paint, which, as its name suggests, erases the inside of the circle (that the first paint drew) to only leave an outline.
mEraserPaint = new Paint();
mEraserPaint.setAntiAlias(true);
mEraserPaint.setColor(Color.TRANSPARENT);
mEraserPaint.setXfermode(new PorterDuffXfermode(PorterDuff.Mode.CLEAR));
The bounds will be defined in updateBounds() mentioned above in onSizeChange() as these will only change if the whole view gets resized. All we need here is to define the rectangles for the outer and inner edges of the circle. These will be used by the circle paint and eraser paint, respectively.
private void updateBounds() {
    final float thickness = getWidth() * THICKNESS_SCALE;

    mCircleOuterBounds = new RectF(0, 0, getWidth(), getHeight());
    mCircleInnerBounds = new RectF(
            mCircleOuterBounds.left + thickness,
            mCircleOuterBounds.top + thickness,
            mCircleOuterBounds.right - thickness,
            mCircleOuterBounds.bottom - thickness);

    invalidate();
}
Finally, we apply all of the above in onDraw(). Since we’re drawing on a bitmap, we will need to clear it from the previous frame first. Then we draw the arc and the erased inner circle onto the bitmap canvas; the sweeping angle defines how much of the circle is filled in (from 0 to 360 degrees). However, we cannot see the contents of the bitmap until it’s applied to the view canvas, which is done last.
@Override
protected void onDraw(Canvas canvas) {
    mCanvas.drawColor(0, PorterDuff.Mode.CLEAR);

    if (mCircleSweepAngle > 0f) {
        mCanvas.drawArc(mCircleOuterBounds, 270,
                mCircleSweepAngle, true, mCirclePaint);
        mCanvas.drawOval(mCircleInnerBounds, mEraserPaint);
    }

    canvas.drawBitmap(mBitmap, 0, 0, null);
}
Now that we can draw a static arc for any given sweeping angle, we need to animate that angle changing for the duration of the countdown timer.
To achieve that, we iterate between 0 and 1 with a ValueAnimator, which defines the progress fraction for the angle. A linear interpolator is used to ensure an even growth of the arc; other interpolators will give an inaccurate impression of the progress of our countdown.
public void start(int secs) {
    mTimerAnimator = ValueAnimator.ofFloat(0f, 1f);
    mTimerAnimator.setDuration(TimeUnit.SECONDS.toMillis(secs));
    mTimerAnimator.setInterpolator(new LinearInterpolator());
    mTimerAnimator.addUpdateListener(
            new ValueAnimator.AnimatorUpdateListener() {
        @Override
        public void onAnimationUpdate(ValueAnimator animation) {
            drawProgress((float) animation.getAnimatedValue());
        }
    });
    mTimerAnimator.start();
}
The actual setup for each frame is trivial: we multiply the progress fraction by 360 degrees to get the sweeping angle for each frame and simply invalidate the view to invoke a new draw cycle.
private void drawProgress(float progress) {
    mCircleSweepAngle = 360 * progress;

    invalidate();
}
Although the ultimate result of this exercise is a simple coloured arc that grows into a circle, we’ve learned a few things that can be useful in real applications: drawing basic shapes, erasing parts of those shapes to create more complex shapes and finally working with timers and coordinates to create frame-by-frame animations of your drawings. Combining that knowledge with more exploration of the API can help achieve more impressive and practically useful results.